Step 1: Qi Coil Setup Wizard
Download Your Qi Coil System Setup Guide (Printable PDF)
Step 2: Watch The Quick Start Guide Video
Step 3: Frequencies Quick Start Guide
Step 4: Read Our FAQS
System Setup
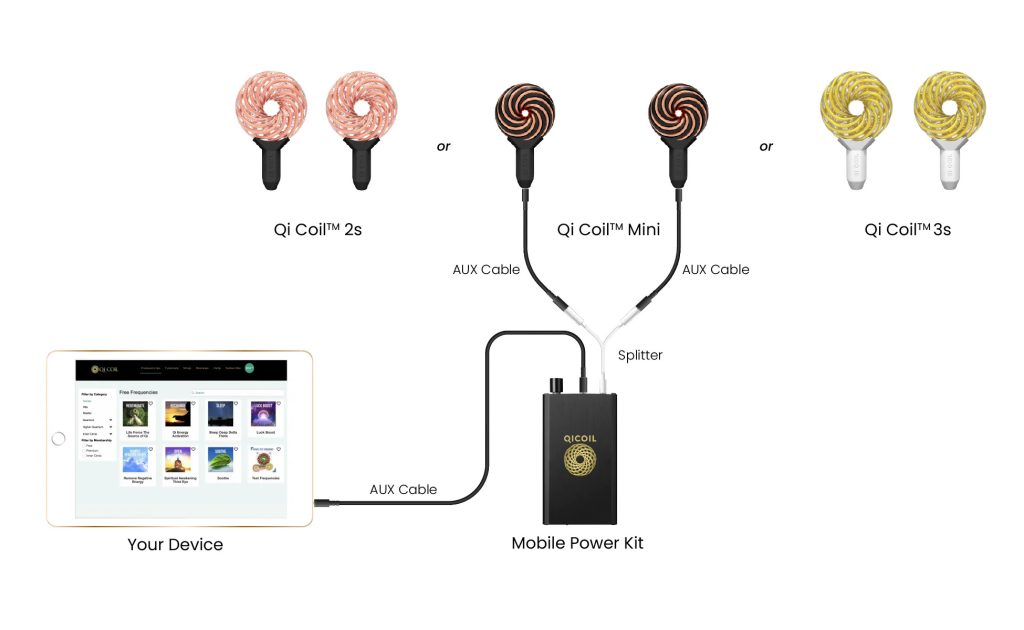
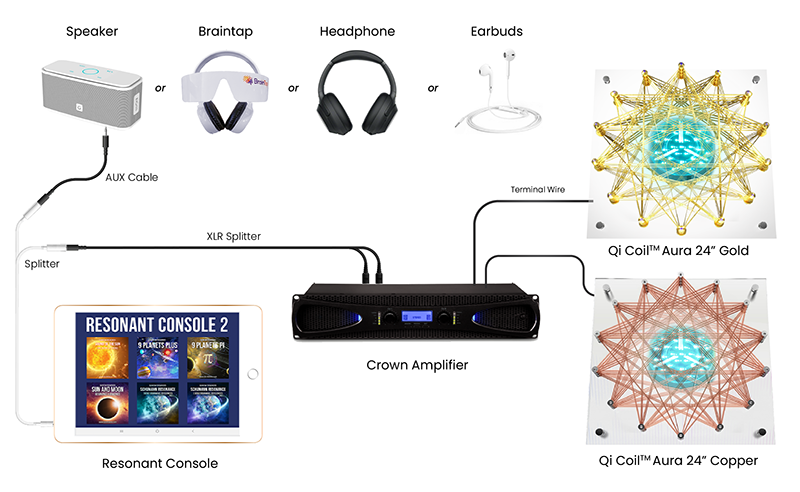
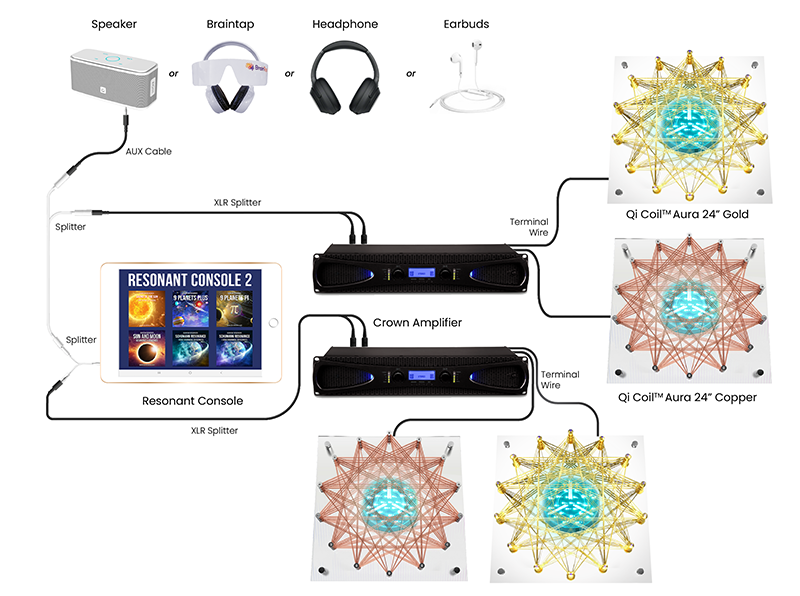
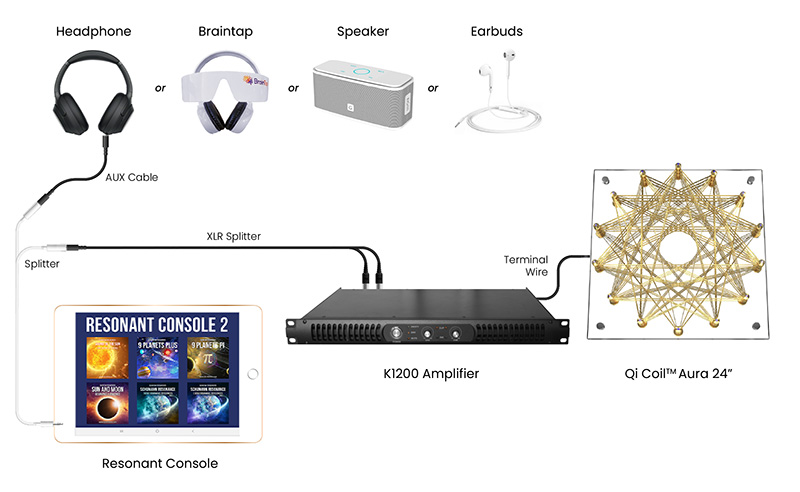
How do I set up the Qi coils? Should I follow the setup video?
You can set up the Qi coils by following the video instructions in the setup section.
How do I connect the Qi coils to my iPhone?
To connect the Qi coils to your iPhone, use the included iPhone adapter (lightning cable) or follow the instructions in the setup tutorial video.
How do I connect the Qi coils to an Android device with no headset port?
All of our Qi Coil Systems are compatible with Android mobile devices. For newer models, you may need to get a USB-C to 3.5mm female cable, and you can purchase one from a local store near you, or order from third-party websites like Amazon.
Can I use the Qi Coils wirelessly?
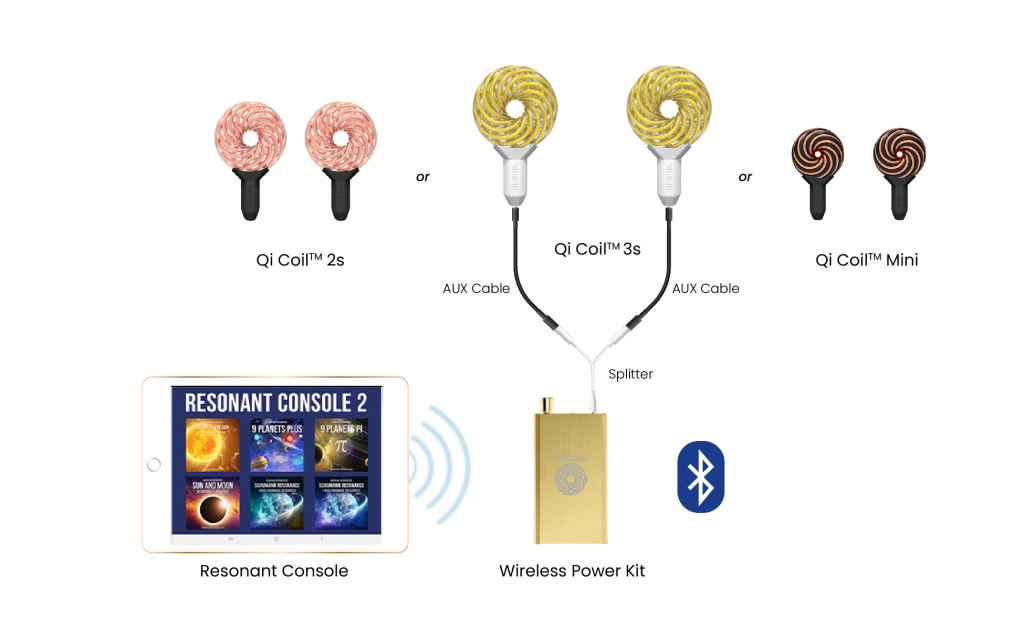
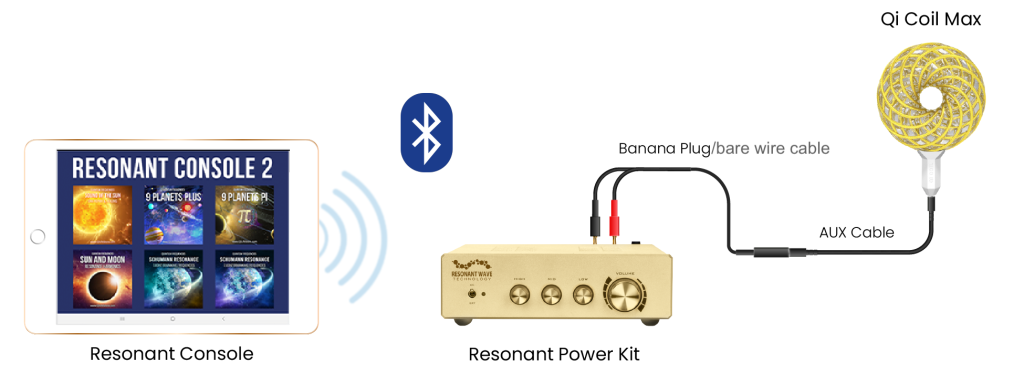
Yes, you can use the Qi Coils wirelessly when they are connected to the gold wireless power kits. These power kits facilitate wireless connectivity by establishing a Bluetooth connection with your tablet or mobile device.
Can I use the Qi Coils without Wi-Fi on the resonant console/tablet?
For our latest resonant console tablet, YES, you can use the Qi Coils without requiring Wi-Fi connectivity on the console. For our older resonant console models, WiFi is required.
What should I know about charging the Mobile Power Kit?
Always charge the mobile power kit before use, and ensure it’s set to Hi-gain. It’s fully charged when the LED indicator turns blue (usually 1-2 hours). It’s also recommended to leave the USB power cable plugged in so that it remains charged at all times.
What are the setup requirements for the High Power kit?
Ensure correct connection of bare wires (red to red, black to black), push the tone/direct switch out, keep treble and bass at 50%, and set the volume to 100% for testing (not higher than 50% for regular use).
Are there any interesting side effects with Quantum frequencies and Qi Coils?
While side effects can vary from person to person, some individuals using Qi Coils have reported experiencing intriguing effects beyond the usual sensations. These may include increased thirst, more vivid dreams, a sense of experiencing lucky coincidences, heightened senses such as improved sight, hearing, taste, and touch, increased creativity and intuition, as well as a deeper state of calmness during meditation.
Best Practices
Can I use the Qi coils all day, or even while I sleep?
You can use the Qi coils all day and even while you sleep. However, it’s advisable to use a lower power setting for long term or 24/7 use. View the video demonstrating how Qi Coil enhances your sleep quality.
Which Frequencies Should I Start With?
We recommend beginning your Qi Coil journey with the 8 free basic frequencies: Remove Negative Energy, Luck Boost, Sleep, Calm, Open, Soother, Recharge, and Regenerate. These foundational frequencies address a wide range of wellness needs and can be easily accessed at https://members.qicoil.com or through your Resonant Console. Once you’ve experienced these fundamental frequencies, you can explore the extensive range of Rife frequencies, Quantum Frequencies, Higher Quantum Frequencies, and Inner Circle Frequencies to further customize your Qi Coil experience and target specific aspects of your well-being.
Where should I place the Qi Coils for optimal results?
You can place the Qi coils on any body part you feel requires therapy or an energy boost, as well as on chakra points for holistic wellness. However, it’s important to note that because each qi coil has a broadcasting range, you don’t necessarily have to touch them to receive the energy. You can position them on a table, countertop, or near your bed, ensuring that their energy fields effectively reach and benefit you. For more detailed placement information and advanced configurations, we recommend watching our instructional video on Yin and Yang Qi Coil placements, which offers valuable insights into maximizing your Qi Coil experience.
What are the common sensations when using Qi Coils?
When using Qi coils, common sensations often include tingling, warmth, and an overall sense of relaxation. These experiences are indicative of the flow of Qi energy or life force. It’s important to note that individual experiences may vary, and some users may also report feelings of increased vitality, a gentle breeze-like sensation, or heightened awareness of energy movement throughout their body. These sensations are all part of the holistic experience of using Qi coils to promote well-being.
How Long Should I Use the Qi Coils Each Day? Can I Use Them Too Much?
It is generally recommended to start with a 30-minute daily usage of Qi coils at a high volume setting, although sensitivity varies from person to person. The “dosage” of energy delivered depends on both the volume setting and the duration of use. Additionally, each frequency may have different effects on individuals, and various Qi coil systems have varying power levels. It’s advisable to begin with 30 minutes and gradually increase both the duration and power setting as needed, depending on your comfort level. If you experience Herxheimer (detox / healing crisis) effect symptoms (flu-like reactions) or any discomfort, it may indicate that you are using the coils too intensely, and in such cases, it’s recommended to lower the setting. While using Qi coils 24/7 is possible, it’s advised to maintain a lower power setting for extended use to ensure comfort and well-being.
Long Term Use
Why Can’t I Hear Anything When Using Qi Coils? Is There Any Sound or Light Associated with the Qi Coil? And What Is the Difference Between Sound Therapy and Magnetic Therapy?
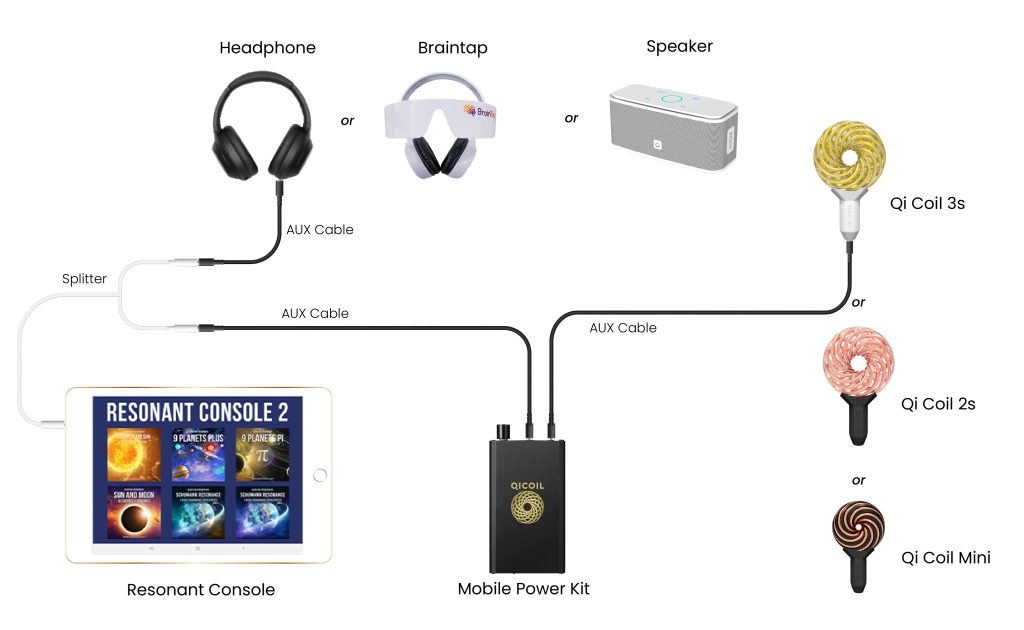
No visible light is emitted from the Qi Coils during use, and they do not produce sound. However, if you wish to experience sound therapy in conjunction with magnetic energy therapy, you can use a splitter to combine the use of headphones or speakers. This allows you to simultaneously hear the frequencies for sound therapy while benefiting from the Qi Coils’ magnetic energy therapy. For more details on this advanced setup, please refer to the video below
Does the Effectiveness of Qi Coils Diminish with Long-Term Use, or Do They Continue to Provide Consistent Benefits Over Time?
No, there is generally no diminishing return when using long-term Qi Coils. In fact, many users find that the longer they use Qi coils, the more they benefit from them. Qi energy is believed to help raise the baseline of well-being with each use, gradually restoring the mind and body to its optimal state. Rather than reducing effectiveness, consistent use of Qi Coils is often seen as a way to maintain and continually improve overall wellness over time.
How Long Do the Effects of Using Qi Coils Last, and How Soon Can I Expect to Experience These Effects?
The duration of the effects and the time it takes to experience them with Qi Coils can vary from person to person and depend on individual factors and intended usage. While some users may instantly feel a sense of calmness or focus, others may require up to 21 days of consistent use to realize the benefits fully. To maximize your results, using Qi Coils consistently over time is recommended.
How can I sustain the effects of using Qi Coils?
To sustain the effects of using Qi coils, continue regular usage within recommended guidelines. Experiment with different settings to find what works best for you.
Functionality and Maintenance
How do I know if the Qi coils are turned on and working?
When using the Qi Coils, there are two tools to help you confirm that they are operational. The first is the Gold Therapeutic Magnet, which serves a dual purpose. It allows you to physically feel the vibrations of the energy emitted by the Qi Coils, providing tactile feedback during your sessions. Additionally, it serves as a tool to verify that the coils are indeed producing magnetic energy.
The second tool is the Magnet Ball contained within the jar. This serves primarily for visual observation. As the Qi Coils generate magnetic energy, you’ll be able to see the ball move inside the jar. While it doesn’t have the same therapeutic function as the Gold Therapeutic Magnet, it provides a visual confirmation of the energy output.
It’s worth noting that not all frequencies will cause the Gold Magnet to vibrate or move the small Magnet Ball. To observe these physical effects, it’s recommended to use the test frequency of 33.3Hz. Higher frequencies may have minimal or no noticeable physical effects, but they are still actively broadcasting energy, which can be measured using an EMF meter.
How Long Does the Qi Coil’s Power Kit Battery Last?
The battery life of the power kit typically ranges from 1 to 6 hours, depending on factors like the power setting, the frequency used, and the number of coils in use. To ensure uninterrupted usage, you have the option to keep the power kit plugged in using the USB power cable, allowing it to play continuously without needing to be recharged.
Is it safe to touch the Qi Coil?
Yes, it is safe to touch the Qi Coil. The wires are insulated and the voltage is low. We use enamel-coated wire for each of the coils which we produce. In most PEMF-style applications, the coils are completely safe to touch. If connected to your mobile device, the wattage is low so the coils will not heat up. We do not recommend connecting the Qi Coils to anything other than your mobile phone or device.
Can I play any frequencies with the Qi Coils?
Qi Coils are capable of playing a range of frequencies. However we recommend using only frequencies from our Resonant Console tablet or webapp.
Additional Information
How Can I Use Qi Coils to Energize Water and Food?
Qi Coils can be used to energize water and food by placing the items near the coils during operation. This process is believed to enhance the vitality of the substances. When it comes to water, in addition to energizing, Qi Coils are also known to have water restructuring effects. Restructured water is thought to have improved absorption and hydration qualities, potentially offering benefits such as better cellular hydration and overall well-being.
Can Qi Coils be used with animals?
Yes, Qi Coils can be used with animals. Many pet owners and animal enthusiasts have reported positive experiences using Qi Coils on their pets. Just like with humans, Qi Coils may help promote relaxation, reduce stress and anxiety, and support overall well-being in animals.
Can I Use the Qi Coils Without Plugging Them In?
While the primary function of the Qi Coils is to broadcast magnetic energy when connected to power kits and resonant consoles or mobile devices, some individuals find therapeutic benefits in simply holding or gazing at the coils. This is because the wiring is based on sacred geometry, and the Quantanium Crystals (Qi Coil 3/Max only) within the coils retain the frequencies played through them for 1-2 days. While they are most effective when connected to a power source, the unique design of the coils may still offer some benefits through physical contact or visual interaction for specific applications like meditation or setting intentions.
What are the gold wires (Qi Coil 3/Max/Aura) made of?
The gold wires used in Qi Coils are made of gold-enameled copper.
What are the toroids Qi Coil bodies made of?
The bodies of Qi Coil Mini are made on black composite and Qi Coil 3/max are made of medical-grade crystalline orgone.
- Qi Coil™ are primarily made of a composite frame and copper wiring.
- Qi Coil™ 2 is made of Solid Crystaline Orgone Toroid Base with either Copper or Gold Colored Copper wiring.
- Qi Coil™ 3 and higher are made of Solid Crystaline Orgone Toroid Base with either Copper or Gold Colored Copper wiring. Also, they include specially treated citrine Quantanium™ crystals inside.
What is the difference between Yin and Yang coils?
Yin and Yang coils differ in winding direction, and their effects or sensations can vary depending on their configuration relative to your body. To learn more about their specific applications
Contraindications
Can Qi Coil be used with a pacemaker?
For safety reasons, it is advisable not to use Qi coils or similar PEMF devices if you have a pacemaker, as there is a potential risk of electromagnetic interference. While some other PEMF companies claim it’s safe, the limited research available on this topic makes it essential to err on the side of caution. To ensure your well-being, it is strongly recommended that you consult with your cardiologist or healthcare professional, who can provide you with personalized guidance based on your specific medical history and the capabilities of your pacemaker.
Can Qi Coils Be Used with Metal Implants?
Using Qi Coils or similar PEMF therapy devices with metal implants may potentially cause discomfort or affect the function of the implant. It’s essential to consult your healthcare provider, particularly the specialist responsible for your implant, for personalized guidance regarding the safe use of these devices based on your specific situation.